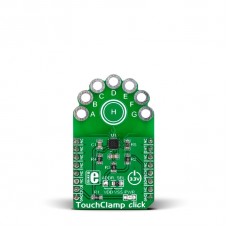
TouchClamp click
Description
TouchClamp click is a mikroBUS™ add-on board with NXP’s MPR121 proximity capacitive touch sensor controller. It has seven plated holes for clamps which can be used to connect any – literally any – conductive object in order to use it as an input button to send an interrupt to the target board MCU. It’s great for creating installations where users interact with the environment in unexpected ways. There’s also an extra capacitive button in the middle. TouchClamp click communicates with the target MCU through the mikroBUS™ INT pin and I2C interface (SCL, SDA). The board has an onboard ADDR. SEL. jumper for choosing I2C addresses. Designed to use a 3.3V power supply only
Specification
| Type | Capacitive |
| Applications | Capacitive sensing using external objects wired up to the board for creating innovative remote controls. |
| On-board modules | NXP’s MPR121 proximity capacitive touch sensor controller |
| Key Features | 7 plated holes for clamps |
| Key Benefits | Auto-configuration and auto-calibration for each sensing input |
| Interface | GPIO,I2C |
| Input Voltage | 3.3V |
| Compatibility | mikroBUS |
| Click board size | M (42.9 x 25.4 mm) |
Features and usage notes
The easiest way to experiment with TouchClamp click is to use wires with alligator clips. Let your imagination roam free when choosing conductive objects. Cans, fruit, jar lids, and much more. The MPR121 chip has several features that simplify development and integration.
First, it applies 3 levels of digital filtering to the raw ADC data to remove high and low frequency noise, ensuring that the interrupts are properly registered in a broad range of applications.
Additionally, MPR121 has an auto-calibration function. According to the vendor's data sheet, it "continually learns the background baseline capacitance of each individual electrode, so the system only has to program the amount of small change from these baselines that represents a touch or release."
Finally, the electrodes are auto-configurable. Given a target charge level, the chip can automatically run to get an optimized setting of charge current and charge time for each electrode without knowing the specific capacitance value on the electrode input.
In additioan to the seven plated holes marked A through G, a central capacitive button "H" is also available.
Another interesting applications is to use conductive paint to draw your own input surfaces in whichever way you want.
Our learn.mikroe.page has an interesting example scenario that could be applied in a retail store. We wired jars with different types of food in them to TouchClamp click. Placing your hand on any of the lids displays the nutritional values of the content inside.
Programming
The following code snippet shows how to identify which electrode was pressed using on a TFT display.
1    tc_hal_init( 0x5A );
2     tc_default_config();
3     Delay_ms( 200 );
4
5     while( 1 )
6     {
7         if( tc_get_ts( ELE_A ) )
8             UART1_Write_Text( "Electrode A touch detected" );
9     }
Code examples that demonstrate the usage of Touchclamp click with MikroElektronika hardware, written for mikroC for ARM, AVR, dsPIC, FT90x, PIC and PIC32 are available on Libstock
Downloads
Enter the code in the box below:


