Arduino Wifi Shield


This Product has been discontinued.
The Arduino WiFi Shield connects your Arduino to the internet wirelessly. Connect it to your wireless network by following a few simple instructions to start controlling your world through the internet. As always with Arduino, every element of the platform – hardware, software and documentation – is freely available and open-source. This means you can learn exactly how it's made and use its design as the starting point for your own circuits.
-
Requires an Arduino board (not included)
-
Operating voltage 5V (supplied from the Arduino Board)
-
Arduino Due compatible
-
Connection via: 802.11b/g networks
-
Encryption types: WEP and WPA2 Personal
-
Connection with Arduino on SPI port
-
on-board micro SD slot
-
ICSP headers
-
FTDI connection for serial debugging of WiFi shield
-
Mini-USB for updating WiFi shield firmware
Documents
OSH: Schematics
Arduino WiFi Shield is open-source hardware! You can build your own board using the following files:
EAGLE FILES IN .ZIPSCHEMATICS IN .PDF
The Arduino WiFi Shield allows an Arduino board to connect to the internet using the 802.11 wireless specification (WiFi). It is based on the HDG204 Wireless LAN 802.11b/g System in-Package. An AT32UC3 provides a network (IP) stack capable of both TCP and UDP. Use the WiFI library to write sketches which connect to the internet using the shield. The WiFI shield connects to an Arduino board using long wire-wrap headers which extend through the shield. This keeps the pin layout intact and allows another shield to be stacked on top.
The WiFi Shield can connect to wireless networks which operate according to the 802.11b and 802.11g specifications.
There is an onboard micro-SD card slot, which can be used to store files for serving over the network. It is compatible with the Arduino Uno and Mega. The onboard microSD card reader is accessible through the SD Library. When working with this library, SS is on Pin 4.
Arduino communicates with both the Wifi shield's processor and SD card using the SPI bus (through the ICSP header). This is on digital pins 11, 12, and 13 on the Uno and pins 50, 51, and 52 on the Mega. On both boards, pin 10 is used to select the HDG204 and pin 4 for the SD card. These pins cannot be used for general I/O. On the Mega, the hardware SS pin, 53, is not used to select either the HDG204 or the SD card, but it must be kept as an output or the SPI interface won't work.
Digital pin 7 is used as a handshake pin between the WiFi shield and the Arduino, and should not be used.
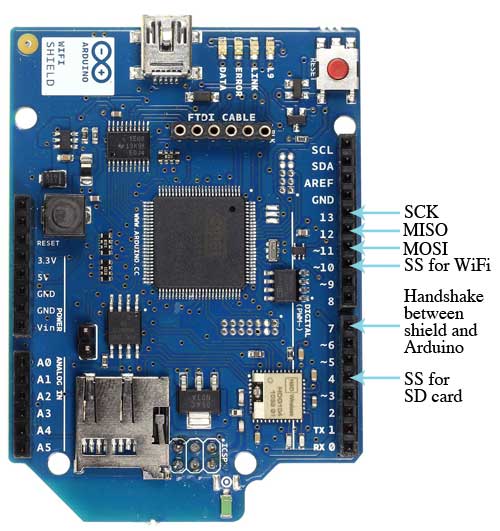
Note that because the HDG204 and SD card share the SPI bus, only one can be active at a time. If you are using both peripherals in your program, this should be taken care of by the corresponding libraries. If you're not using one of the peripherals in your program, however, you'll need to explicitly deselect it. To do this with the SD card, set pin 4 as an output and write a high to it. For the HDG204, set digital pin 10 as a high output.
The shield can connect to encrypted networks that use either WPA2 Personal or WEP encryption. It can also connect to open networks. A network must broadcast its SSID for the shield to be able to connect.
Attention
The previous version of this shield uses a HDG104 instead of the actual HDG204.
On board interfaces
The reset button on the shield resets both the HDG204 and the Arduino board.
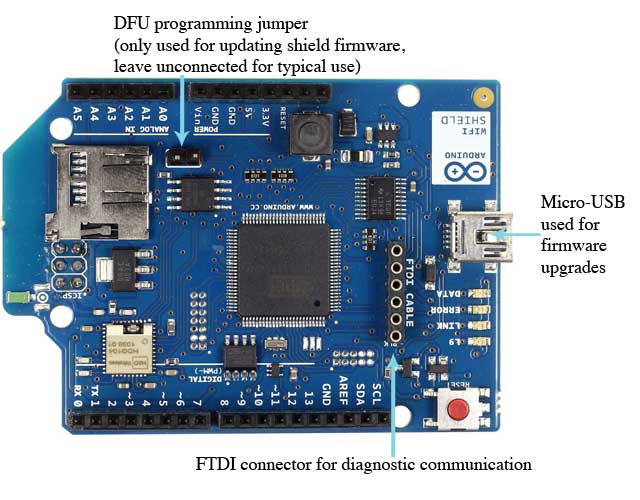
There is an onboard Mini-USB connector. This is not for programming an attached Arduino, it is for updating the AT32UC3 using the Atmel DFU protocol. The programming jumper adjacent to the power bus and analog inputs should be left unconnected for typical use. It is only used for DFU programming mode.
A FTDI connection enables serial communication with the 32U for debugging purposes. A list ofavailable commands can be found here.
On board indicators
The shield contains a number of informational LEDs:
-
L9 (yellow) : this is tied to digital pin 9
-
LINK (green) : indicates a connection to a network
-
ERROR (red) : indicates when there is a communication error
-
DATA (blue) : indicates data being transmitted/received
Updating firmware on the shield
Please follow this guide to update the firmware on your shield.
See also : getting started with the WiFi shield and WiFi library reference
Getting Started
You can find in the Getting Started section all the information you need to configure your board, use the Arduino So ftware (IDE), and start tinker with coding and electronics.
Need Help?
-
On the Software on the Arduino Forum
-
On Projects on the Arduino Forum
-
On the Product itself through our Customer Support
Enter the code in the box below: