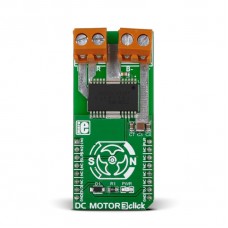
DC MOTOR 3 Click
Two pairs of screw terminals are positioned on the top of the board. One is for bringing an external power supply; the other is for connecting a motor.
TB6549FG has four operating modes: clockwise, counter-clockwise, short brake and stop. The operating mode is configured through IN1 and IN2 pins. A separately controlled standby mode is also available.
For safety, the TB6549FG IC incorporates overcurrent protetciont and a thermal shutdown circuit.
The click communicates with the target MCU through the mikroBUS™ PWM pin, with additional functionality provided by IN1, IN2 and SLP pins (in place of default mikroBUS™ AN, RST and CS pins). Designed to use a 3.3 power supply only.
Specification
| Type | DC |
| Applications | Driving high power DC motors |
| On-board modules | Toshiba TB6549FG full-bridge driver |
| Key Features | Drives motors up to 3.5A with 30V |
| Key Benefits | Four operating modes: CW, CCW, short brake and stop, Built-in overcurrent protection and thermal shutdown circuit |
| Interface | GPIO,PWM |
| Input Voltage | 3.3V or 5V |
| Compatibility | mikroBUS |
| Click board size | L (57.15 x 25.4 mm) |
DC Motor 3 click is a mikroBUS™ add-on board with a Toshiba TB6549FG full-bridge driver for direct current motors. The IC is capable of outputting currents of up to 4.5 A with 30V, making it suitable for high-power motors.
Features and usage notes
Summary of TB6549FG specifications:
- Power supply voltage: 30 V (max)
- Output current: 3.5 A (max) (FG,PG type)
- Low ON-resistance: 1.0 Ω (up + low/typ.)
- PWM control capability
- Standby system
- Function modes: CW/CCW/short brake/stop
- Built-in overcurrent protection
- Built-in thermal shutdown circuit
Programming
This example shows how to setup the DC Motor 3 on ARM, and use buttons to turn the motor, as well as speed up or slow down the motor.
 1 #include "dc_motor3.h"
 2
 3 unsigned int current_duty;
 4 unsigned int pwm_period;
 5
 6 sbit SLP at GPIOD_ODR.B14;
 7 sbit IN2 at GPIOC_ODR.B3;
 8 sbit IN1 at GPIOA_ODR.B5;
 9
10 void main()
11 {
12   GPIO_Digital_Input (&GPIOE_BASE, _GPIO_PINMASK_8 | _GPIO_PINMASK_9 | _GPIO_PINMASK_10 | _GPIO_PINMASK_11 | _GPIO_PINMASK_12); // configure PORTE pins as input
13
14
15   GPIO_Digital_Output (&GPIOD_BASE, _GPIO_PINMASK_14 );
16   GPIO_Digital_Output (&GPIOC_BASE, _GPIO_PINMASK_3 );
17   GPIO_Digital_Output (&GPIOA_BASE, _GPIO_PINMASK_5 );
18
19   current_duty  = 40000;                        // initial value for current_duty
20   pwm_period = PWM_TIM4_Init(5000);
21
22   PWM_TIM4_Set_Duty(current_duty,  _PWM_NON_INVERTED, _PWM_CHANNEL1);  // Set current duty for PWM_TIM1
23   PWM_TIM4_Start(_PWM_CHANNEL1, &_GPIO_MODULE_TIM4_CH1_PD12);
24
25
26  while(1)
27   {
28           if (Button(&GPIOE_IDR, 8, 50, 1))
29           {
30                dc_motor3_clockwise();
31           }
32
33           if (Button(&GPIOE_IDR, 9, 50, 1))
34           {
35                dc_motor3_counter_clockwise();
36           }
37
38           if (Button(&GPIOE_IDR, 10, 50, 1))
39           {
40
41                 Delay_ms(1);
42                current_duty *= 2;
43                PWM_TIM4_Set_Duty(current_duty,  _PWM_NON_INVERTED, _PWM_CHANNEL1);
44           }
45
46           if (Button(&GPIOE_IDR, 11, 50, 1))
47           {
48                  Delay_ms(1);
49                  current_duty /= 2;
50                  PWM_TIM4_Set_Duty(current_duty,  _PWM_NON_INVERTED, _PWM_CHANNEL1);
51           }
52
53           if (Button(&GPIOE_IDR, 12, 50, 1))
54           {
55                dc_motor3_stop();
56           }
57     Delay_ms(1);
58   }
59
60 }
Code examples for DC MOTOR 3 click are available for ARM and AVR compilers. Download them from Libstock
Downloads
Enter the code in the box below:


